- hello@virtuallyuntangled.com
- Monday - Thursday 7:00am - 3:00pm (CST)
My Top Favourite Photoshop Tricks …
Fun fact … did you know that Photoshop was the program that changed our perception of images in 1987 by two brothers, Thomas and John Kroll, who later sold the distribution rights to the Adobe System Incorporated?
WOW! Who knew Photoshop even existed that long?
Since then Adobe Photoshop has been widely used by designers, editors and artists worldwide by helping them turn ordinary pictures into mind blowing masterpieces. It is a wonderful tool for anyone willing to invest time and money into learning it’s features. Honestly … it’s a game changer.
With that being said, today I am going to share with you my TOP favourite tricks. So, pull up a chair and let’s get started ….
Basic Liquify:
Photoshop’s liquify tool is often used by photographers as it is best utilized for creating crazy images with distorted effects. It basically takes a part of the image you choose and allows you to manipulate the pixels in that area to create the illusion of movement. I bet you’re now wondering how to make this work with your projects. Well, depending on what type of image you’re working on here’s a helpful link from Adobe themselves … https://helpx.adobe.com/photoshop/using/liquify-filter.html
Combine Images with Text:
This is one of Photoshop’s most popular effects. Here are the quick and simple step-by-steps on how to accomplish this amazingly classic effects curtesy of Creative Pro.
Removing Unwanted Objects:
Want to remove people and other distracting objects from one of your photos? You can in mere seconds but only you have done this beforehand. With your camera on a tripod, take 15 shots of the same view, spaced 10 seconds from each other. Inside Photoshop, go to File > Scripts > Statistics. Choose “Median” and then select all the image files you have taken. Photoshop will look at what is different in the photos and remove it.
Multi-Level Group Masking:
Layer masks are truly the building blocks of Adobe Photoshop. I use them daily and in almost every document I create. Most of the time one-layer mask is enough, but there are certain situations when you find that you will need more than one mask. For a quick tip, you can apply 11-layer masks to any single layer. Here’s how … with the Layer Group targeted in the Layers panel, click the Add Layer Mask icon from the bottom of the Layers panel. Paint in the mask to control the visibility of all layers within the Layer Group. This shortcut also works with vector masks (and a combination of both vector and raster).
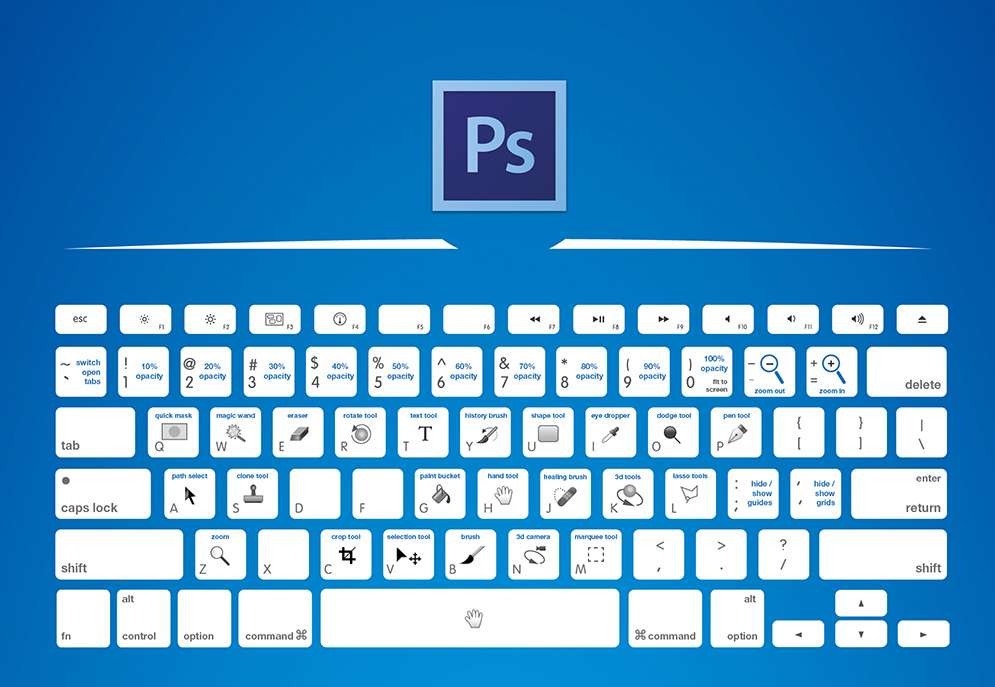
Essential Shortcuts:
Multiple Undos:
This is typically Ctrl + Z in most software programs but not here. Performing this function only gets you an undo once. For multiple undos use Ctrl + Alt + Z.
Toggling Ruler/Guides:
Using rulers and guides are a necessity when it comes to precise placement of objects and at time you may even need to toggle them to view your work without any distractions. To toggle your rulers click Ctrl + R and to toggle your guides click Ctrl + ; and BAM … full view mode!
Overlay Dodge and Burn:
One of the best ways to lighten and darken non-destructively is by painting on a grey layer. Alt-click the New Layer icon in the Layers Panel. Set its Blend Mode to Overlay and tick the Fill With box to make a grey layer, then grab the Brush Tool and paint with white or black at around 10% opacity to dodge and burn selected areas of your photo. And …. Done!
Creating Seamless Patterned Art:
Creating patterns within Photoshop is often an overlooked yet handy feature. You can create some very powerful designs utilizing pattern layers. When creating a pattern is a good idea to keep seamless designs in mind, even though not all things in nature are seamless. The best way to do this is by using Filter > Other > Offset. So, for example, let’s say your canvas is set to 500×500 pixels … your offset would need to be 250 pixels vertical and horizontal. After clicking “Okay” for the offset option, you can then remove the seam lines with the Clone Stamp or the Healing Brush . To define the pattern click Edit > Define Pattern then the pattern will be accessible from the Pattern Palette when you select the Paint Bucket Tool or when you create a new pattern layer from the Layer Palette. Sounds like a good handful of steps but truly simple once you give a few a try 🙂
Whether you are an advanced user or just getting started – there is never a shortage of tips in this program. These few steps only break the surface to make your design habits more efficient.
So, if you have additional tips that you’d like to share with the crowd to help them further express their creativity, please feel free to drop your two cents into the comments. Or if you are interested in learning more about how Adobe Photoshop can benefit you, drop me a line. I would love to teach you more about this incredible program and all it has to offer.
Like this blog post?
If you found today’s blog post to be exactly the type of inspiration and know-how you were looking for, we would be very grateful if you would help this post spread
by sharing the LOVE  with it socially, emailing it to a friend or dropping us a comment with your thoughts. You never know whose life you might change.
Share on Facebook
Share on Twitter
Share on Linkdin
Share on Pinterest

Crystal Kordalchuk
Crystal is an artist, a writer, an organizer, a dreamer, a doer, and down-right proud of it NERD!.
Struck with a love for #AllThings creative at a very young age, Crystal dreamed of a life fueled by her passion for creating and bringing the stories and images in her mind into reality.
As she worked toward her dreams, she earned a diploma as a Computer Applications Specialist then another in Graphic Design and from there began to develop her extensive background in multimedia and the arts. She began her worked in the magazine industry as a layout designer and had a succession of design jobs thereafter. It was her role as a graphic/web designer that gave her the first real glimpse of her future. Soon she began a side job as a freelance designer while keeping one foot in the corporate world. A spark was lit! She turned her freelance gig into a full-time business combining design work with her other passion: creating organization from virtual chaos.
Crystal is one of the most organized individuals on the planet. She is by all means a Zen master of her crafts. She excels at helping others become “untangled” and provides her clients with tools to run their businesses smoothly while she takes care of the details behind the scenes. Thus Virtually Untangled was born. A successful business where her work as a top notch creative in graphic and web — with a twist of virtual assistant — married into one amazing place where clients can come with their virtual messes and become magically untangled. Crystal can always make sense of even the most unorganized chaos and offers a virtual detox of order and peace, so her clients can get busy doing the work that they love the most.
